
Step-by-Step Instructions
Step 1 — Preheat the Oven
Position a rack in the center of the oven and preheat to 425°F (220°C). A hot oven is critical for good biscuits: the high temperature creates the rapid burst of steam inside the dough that produces the lift and fluffiness in the interior while simultaneously browning and crisping the exterior. Biscuits baked in a too-cool oven spread rather than rise and produce a dense, pale result. Allow the oven to reach full temperature before the dough goes in. Lightly brush a standard baking sheet with a small amount of the melted butter, or line with parchment for easier cleanup.
Step 2 — Combine the Dry Ingredients
Measure the self-rising flour by spooning it lightly into a dry measuring cup and leveling the top — do not scoop the cup directly into the flour bag, which compacts the flour and produces more than the recipe calls for. Add the measured flour to a medium mixing bowl and make a well in the center.
Step 3 — Mix the Dough
Pour the buttermilk and approximately half the melted butter (about two tablespoons) into the well in the flour. Using a wooden spoon or a rubber spatula, stir just until the dough comes together into a thick, soft, slightly sticky mass. Count the strokes: you want the flour fully incorporated without any dry patches, but no more stirring than necessary. Overmixing develops the gluten in the flour, which produces tough, rubbery biscuits. Stop stirring as soon as the dough is just combined — a few small lumps are completely acceptable and preferable to a smooth, over-worked dough. The texture should be thicker than a muffin batter but wetter than a kneading dough — it should hold its shape when dropped from a spoon but not be dry enough to roll.
Step 4 — Rest the Dough
Allow the dough to rest in the bowl for five minutes. During this brief rest, the flour continues to absorb the buttermilk and the baking powder begins to hydrate and activate, which produces better rise in the oven than going directly from mixing to baking. This rest also allows the gluten that was developed during mixing to relax slightly, which contributes to a more tender finished biscuit.
Step 5 — Drop the Biscuits
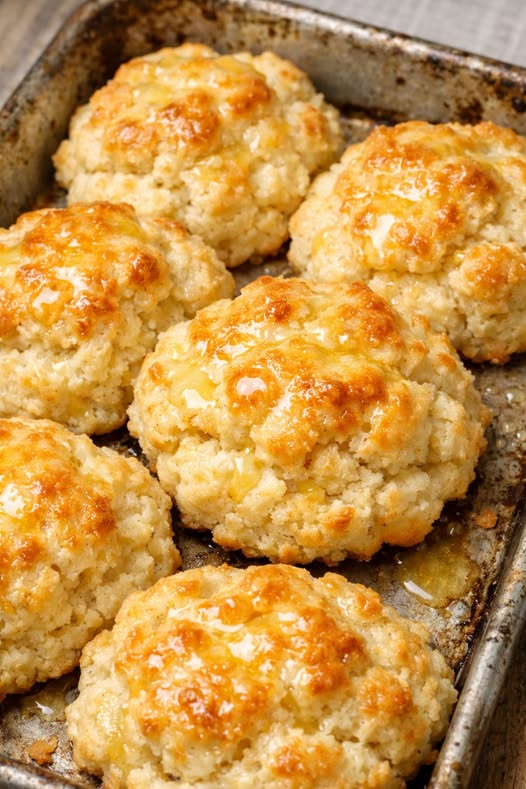
Using a large spoon, a large cookie scoop, or a quarter-cup measuring cup, drop heaping portions of dough onto the prepared baking sheet, spacing each about one inch apart. The portions should be roughly the same size — about a quarter cup each — so they bake at the same rate. Don’t try to smooth or shape the tops: the rough, irregular surface that results from simply dropping the dough produces the characteristic craggy texture that browns and crisps into the best parts of the finished biscuit. Brush the tops of the dough mounds lightly with some of the remaining melted butter.
Step 6 — Bake
Place the baking sheet on the center rack of the preheated oven and bake for 12 to 15 minutes, until the biscuit tops are deep golden brown — not pale yellow, but genuinely golden with darker brown color at the peaks and edges. The bottoms should be evenly browned as well; check by lifting one biscuit with a spatula at the 12-minute mark. The biscuits should have visibly puffed and be firm to a light touch at the top. Under-baked biscuits are pale and gummy in the interior; properly baked biscuits are golden throughout and cooked through to a fluffy, dry crumb.
Step 7 — Brush with Butter and Serve
Remove the baking sheet from the oven and immediately brush the hot biscuit tops with the remaining melted butter. The butter will absorb into the hot crust, produce a glossy, fragrant surface, and keep the tops soft rather than dry as the biscuits cool. Allow the biscuits to cool for just five minutes — long enough that they won’t burn fingers but short enough that they’re still genuinely warm in the center. Serve immediately.
Tips for the Best Results
Don’t overmix. This is the single most important rule for tender biscuits. Mixing develops gluten, and overworked gluten produces tough, rubbery biscuits. As soon as the flour is incorporated and no dry patches remain, stop. The dough will look rough and slightly lumpy — this is correct.
Spoon and level the flour. Scooping the measuring cup directly into the flour bag packs it significantly, adding as much as 20 to 25% more flour than the recipe calls for. Spooned and leveled flour produces the right dough consistency; scooped flour produces a dry dough that bakes into dense, heavy biscuits.
Use a genuinely hot oven. 425°F is the right temperature for drop biscuits. A lower temperature produces spreading rather than rising. An oven thermometer is worth using — many ovens run 25 to 50°F hotter or cooler than their display suggests, and the difference affects biscuit quality meaningfully.
The five-minute rest matters. It’s tempting to drop the biscuits immediately after mixing, but the brief rest genuinely improves the rise and tenderness of the finished biscuit. Set a timer and let the dough sit while the oven finishes preheating.
Brush with butter twice. The pre-bake brush starts the browning and adds flavor to the surface as it cooks; the post-bake brush while the biscuits are still hot produces the shiny, richly fragrant surface that makes fresh biscuits so appealing. Don’t skip the second brush.
Frequently Asked Questions
What if I don’t have self-rising flour?
Make your own by thoroughly whisking together two cups of all-purpose flour with one tablespoon of baking powder and half a teaspoon of fine salt. Use this mixture in exactly the same way as self-rising flour. The result will be very close to the self-rising flour version; the only variation is that home-mixed self-rising flour tends to produce a slightly heartier, denser biscuit than the softer Southern self-rising varieties like White Lily, which use lower-protein flour.
Can I use regular milk instead of buttermilk?
You can, but the biscuits will be noticeably less tender and less flavorful. The acid in buttermilk reacts with the baking powder to produce more lift, and the tang of the buttermilk contributes a characteristic Southern biscuit flavor that regular milk can’t replicate. If buttermilk isn’t available, make a substitute by stirring one tablespoon of white vinegar or lemon juice into 1½ cups of whole milk and letting it sit for five minutes until it curdles slightly. This produces a reasonable approximation of buttermilk’s acidity, though not its full flavor.
Why are my biscuits dense?
The most common cause is over-measuring the flour — scooping the cup directly into the flour bag rather than spooning and leveling adds significantly more flour than the recipe requires, producing a stiff dough that bakes dense and dry. The second most common cause is overmixing — too many stirs develop gluten that makes the texture tough rather than tender. Mix only until combined, then stop. A third possibility is a too-cool oven; check your oven temperature with a thermometer.
Can I make these ahead?
Drop biscuits are best eaten warm from the oven, but they keep reasonably well for one to two days in an airtight container at room temperature. Reheat in a 350°F oven for five minutes or split and toast in a toaster to restore some of the original crispness. They can also be frozen after baking — wrap individually and freeze for up to one month; reheat from frozen in a 350°F oven for 10 to 12 minutes.
Can I add mix-ins to the dough?
Yes. Up to half a cup of finely shredded sharp cheddar folded into the dough just after mixing produces excellent cheese biscuits. A teaspoon of dried herbs — chives, rosemary, thyme — adds herbal flavor without changing the technique. A tablespoon of honey stirred into the buttermilk before adding it to the flour produces a lightly sweetened biscuit that’s excellent with fruit and cream. All additions should be folded in gently with the minimum number of stirs to avoid overdeveloping the gluten.
Variations Worth Trying
Cheddar drop biscuits: Fold half a cup of finely shredded sharp cheddar into the dough just after it comes together. The cheese melts into the interior during baking, producing pockets of savory, slightly sharp richness throughout the biscuit. Add a pinch of garlic powder and a grind of black pepper along with the cheese if you want a more assertive savory character. These are particularly good alongside tomato soup, chili, or as a substitute for dinner rolls with a savory meal.
Honey butter biscuits: Whisk a tablespoon of honey into the melted butter before using it for brushing. The honey caramelizes on the biscuit surface during baking, producing a slightly sweeter, more golden crust with a faint amber color and a honeyed fragrance. Mix a teaspoon of honey into the buttermilk before adding it to the flour for a subtly sweet dough as well. These are particularly wonderful for breakfast or brunch with extra softened butter and jam.
Herb biscuits: Stir a tablespoon of finely chopped fresh chives, rosemary, or flat-leaf parsley into the buttermilk before adding it to the flour. The herbs distribute evenly through the dough and add flecks of green color and fresh herbal flavor to the baked biscuit. Rosemary biscuits are particularly good alongside roasted chicken or lamb; chive biscuits pair naturally with eggs and cream cheese; parsley biscuits work well with soups and stews.
Black pepper and buttermilk biscuits: Add a generous half teaspoon of coarsely cracked black pepper to the flour before mixing. The pepper adds a warming, slightly spicy note that plays well against the tang of the buttermilk and the richness of the butter, producing a biscuit with more personality than the plain version. These are particularly good alongside sausage gravy, fried chicken, or any richly sauced savory dish.
Shortcake version: Add two teaspoons of granulated sugar and one teaspoon of pure vanilla extract to the buttermilk before mixing. This produces a lightly sweetened biscuit with a more tender, cake-like crumb that’s designed for splitting and loading with fresh sliced strawberries and softened lightly sweetened whipped cream — a traditional Southern strawberry shortcake that uses the biscuit’s buttery, slight tang as a counterpoint to the sweet fruit and cream.
What to Serve with These Biscuits
The range of foods these biscuits complement is one of their greatest virtues. For a Southern-style breakfast or brunch, they’re the natural vehicle for sausage gravy — split, pulled apart, and covered with a creamy, savory white gravy with crumbled sausage throughout. Alongside scrambled eggs, crispy bacon, and fresh fruit, they make a complete brunch plate that requires very little additional preparation. For dinner, they pair naturally with chicken and noodles, a pot of ham and white beans, vegetable soup, or any braise or stew with plenty of liquid to soak into the biscuit when it’s split. In spring and summer, topped with sliced fresh strawberries and whipped cream sweetened with a teaspoon of sugar, they become the base for a quick, very good strawberry shortcake that takes advantage of the biscuit’s savory-sweet tension with the fruit. A dish of softened, salted butter and a jar of good preserves or honey on the table alongside a basket of these biscuits is essentially all the accompaniment they need.
Storage
Drop biscuits are at their very best straight from the oven, still warm in the hand with the butter still glistening on top. They remain good for eating at room temperature for the rest of the day of baking. Store leftovers in an airtight container or a zip-lock bag at room temperature for up to two days; the texture softens noticeably after the first few hours as the crust absorbs moisture from the air. Reheat in a 350°F oven for five minutes to restore some of the original crispness, or split and toast for a crunchier result. For longer storage, freeze individually wrapped biscuits for up to one month and reheat from frozen at 350°F for 10 to 12 minutes.
Simple Biscuits, Worth Every Sunday
Southern 3-Ingredient Drop Biscuits are one of those recipes where the simplicity is the point — not as a compromise or a shortcut, but as the correct approach to a particular kind of baking. Three ingredients mixed with a light hand, dropped onto a baking sheet, slid into a hot oven: the result is golden, fluffy, buttery biscuits that hold their own alongside any breakfast, brunch, or dinner they’re placed next to. There’s nothing to improve about the method because nothing about the method is wrong. Make them once on a Sunday morning and you’ll understand immediately why this is the recipe that gets passed down.
Enjoy!